Shopify product personalization: engraving, monograms and custom text
Short answer
Shopify product personalization means letting shoppers add their own details to a product, like engraving text, a monogram or a name and number on a jersey, and getting those details onto the order. Shopify has no built-in personalization fields, so you add them with line item properties in your theme or with a product options app.
The hard part isn't adding a text box: it's asking for exactly what your production process needs, in a form shoppers fill in correctly the first time.
This guide is about made-to-order personalization. If you're looking for "personalized shopping experiences" (product recommendations, tailored content), that's a different topic.
What to collect for each type of personalization
Ask whoever does the engraving, embroidery or printing what they need to make the item without emailing the customer. That list becomes your form.
Engraving
- Text, one field per line.
- Font, limited to the fonts your engraver actually has.
- Placement, if the item has more than one engravable area (front, back, inside a band, lid of a box).
- Number of lines, either as an explicit choice or implied by how many line fields you offer.
Monograms
Monograms cause more mistakes than any other type, because the letter order on the product isn't the order people write their names. In a traditional three-letter monogram for one person, the last-name initial sits in the center, larger, with the first-name initial on the left and the middle-name initial on the right. So Jane Anne Smith becomes J S A, with the S larger.
Two ways to handle it:
- Ask for first, middle and last initial in separate, clearly labeled fields, and arrange them yourself in production. This is the safer option because shoppers just answer the question they're asked.
- Or ask for the initials exactly as they should appear, and say so in the label with an example. This suits stores that offer several monogram layouts.
Either way, say which approach you use right next to the fields. Also collect the style: a traditional three-letter layout, a single initial, or a block-letter style, plus thread or foil color if that's a choice.
Custom text on apparel
For jerseys and team gear, that usually means a name and a number, sometimes with placement (back, sleeve, chest). Use a number field for the number so shoppers can't type "twenty-three", and set the allowed range.
Gift messages
A multi-line text field with a character limit that matches your card size is enough. Make it optional.
Designing the fields
One field per line, not one big box
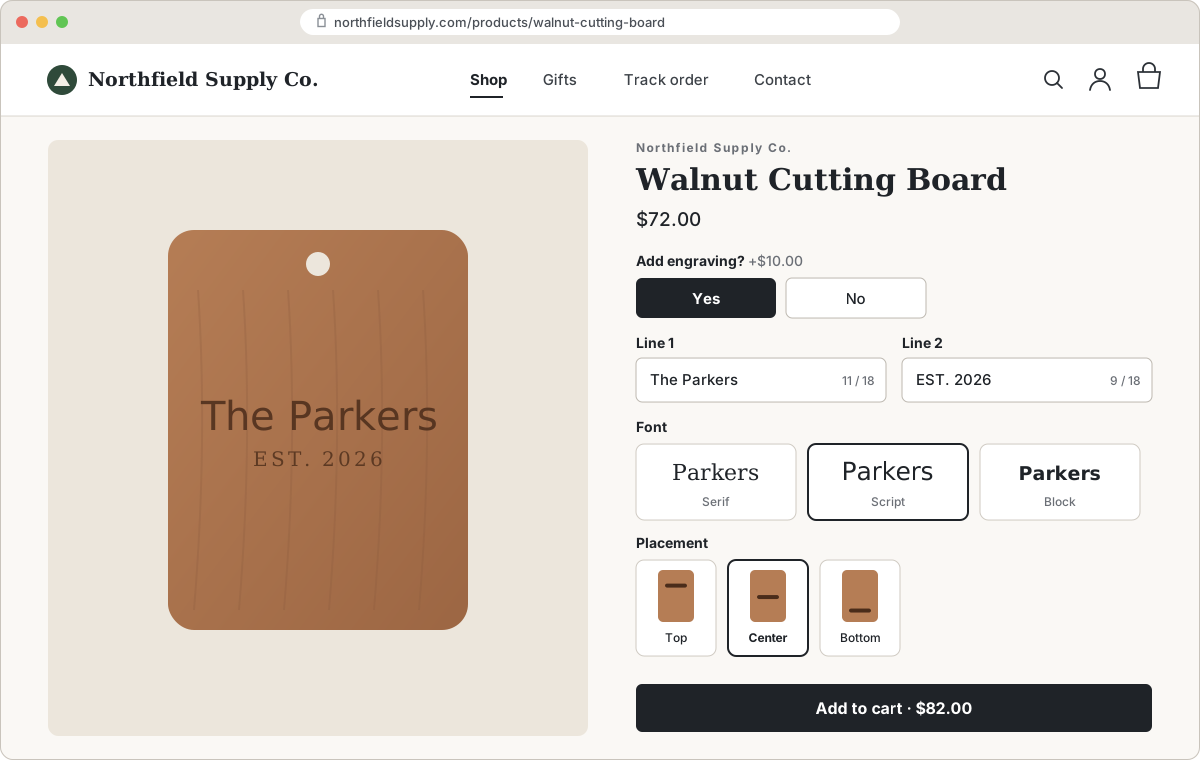
A single multi-line box invites shoppers to decide their own line breaks, which may not fit your layout. If a pendant fits two lines, show "Line 1" and "Line 2" as separate text fields. Your engraver gets the text already split, and the shopper can see what the piece can hold.
Character limits that match the machine
Set a maximum length on every text field, based on what physically fits at your chosen font size. Test it: engrave or stitch the widest possible text (capital Ws and Ms) at the limit and see if it still looks right. Show the limit in the label, like "Up to 12 characters", so shoppers aren't surprised.
Say how capitalization works
If your monograms are always uppercase, or your font only has capitals, say so: "Monograms are engraved in uppercase." If you engrave exactly as typed, say that instead.
Font picker with real previews
A dropdown of font names ("Script 2", "Classic Serif") means nothing to a shopper. Show each font as a sample of the actual typeface, ideally as an image of an engraved or stitched example. Keep the list short, three to five fonts is plenty for most stores.
Placement as images, not words
"Inside band" and "outer face" are clear to you and vague to a shopper. Use radio buttons or image swatches with a small photo of each placement.
Required vs optional
If personalization is the product (a name necklace), make the text required. If it's an extra on a product that sells fine without it (a wallet with optional initials), make the fields optional, or better, hidden until the shopper opts in.
Conditional fields
Put an "Add engraving?" choice first, and only show the text, font and placement fields when the shopper picks yes. The product page stays short for people who don't want personalization, and you avoid half-filled fields on orders that didn't need them. Conditional logic is also how you handle different layouts: choosing "Single initial" shows one field, choosing "Three-letter monogram" shows three.
Live previews: what to expect
Product options apps, including ours, collect the inputs. Infinite Options shows font previews in the font picker and image swatches for placement, but it does not render a live mockup of the shopper's text on your product photo. Apps that do live rendering are usually called product customizers or visual configurators. They're a good fit for highly visual products, and they generally cost more and take more setup, since each product needs a template with print areas defined.
For high-value items like jewelry, furniture or awards, a proof approval step often works better than an on-screen preview anyway: collect the inputs at checkout, send the customer a digital proof, and start production once they approve it.
For when a visual configurator is worth the extra cost and setup, see product configurator or product options app.
A live preview is still possible with Infinite Options if you add some theme code. Our guide to building a Shopify product customizer with a live preview shows how to stack image layers and swap them as shoppers choose.
Getting personalization from the order to production
Inputs land on the order as line item properties
Whether you add fields with theme code or an app, Shopify stores personalization as line item properties: name and value pairs attached to that line of the order, such as "Line 1: Happy 10th". They show in the cart (if your theme displays them, and most do), at checkout and on the order in your admin. The same product with two different engravings becomes two separate cart lines, which is what you want.
Name fields for production: "Engraving line 1" is clearer on a packing slip than "Text".
Put them on packing slips and notifications
Your production team shouldn't have to open each order in the admin. Shopify's packing slip and order notification templates can print line item properties with line_item.properties in Liquid, so the engraving text sits right under the product name. Adding it to the order confirmation email also gives the customer one more chance to spot a typo.
Prevent typos before checkout
Line item properties can't be edited through Shopify's normal order editing after checkout, so catching mistakes before purchase matters. Two simple guards:
- A required checkbox: "I've checked the spelling and understand personalized items are made exactly as entered."
- Show the text back. The cart already does this if your theme displays properties, so make sure it's visible and not cut off.
Returns policy for personalized items
Most stores don't accept returns on personalized items unless they're defective or the store made an error. Whatever your policy is, state it on the product page near the personalization fields, not only in the footer policy page.
Pricing personalization
If personalization costs extra, the fee needs to be on a selectable choice, not on the text box itself. We cover the options, including bundling the fee with the product versus showing it as a separate line, in charging for add-ons like engraving and gift wrap.
Can you do this without an app?
Yes, for simple cases. A developer can add text inputs named properties[Engraving] inside your theme's product form, and they'll flow through to the order. If you sell a handful of products with one free text field each, that may be all you need.
It gets harder once you want conditional fields, font previews, character-limit validation that blocks add to cart, the same fields across many products, or a fee for personalization. Personalization also doesn't belong in variants: it's free-form text, and as we explain in variants vs product options, variants are for things you stock.
Setting it up with Infinite Options
We make Infinite Options, a product options app that adds personalization fields to your product pages and saves everything as line item properties. Here is a typical engraving setup:
- Create an option set and assign it to your engravable products, by product tag, type, vendor or specific products. You can exclude products too, for example everything tagged Digital.
- Add a radio button option, "Add engraving?", with No and Yes. To charge for it, put the price on the Yes choice (our help doc walks through it).
- Add text fields for Line 1 and Line 2, with a max character length on each. Shoppers can't add to cart over the limit.
- Add a font picker with your engraver's fonts, and image swatches for placement.
- Use conditional logic so the text, font and placement fields only show when "Add engraving?" is Yes, and mark them required.
- Add a required "I've checked the spelling" checkbox.
- Preview the option set in the admin, then publish and place a test order to check the cart, order and packing slip.
Infinite Options starts at $12.99/month with a 14-day free trial (as of October 2026). If you also need shoppers to upload a photo or logo, it works with Uploadery inside the same form.
If customers send their own logo or artwork instead of text, see letting customers upload a logo or artwork.
FAQs
Does Shopify have built-in product personalization?
No. Shopify has no built-in personalization fields in the product admin. You add them with line item properties in your theme code or with a product options app, and the shopper's input is saved on the order.
Where does engraving text show up on a Shopify order?
It's saved as a line item property on that order line, so it appears in the cart, at checkout and on the order in your Shopify admin. You can add it to packing slips and order emails with line_item.properties in Liquid.
What order do monogram initials go in?
In a traditional three-letter monogram for one person, the last-name initial goes in the center and is larger, with the first-name initial on the left and the middle-name initial on the right. Many stores ask for first, middle and last initials separately and arrange them in production to avoid mix-ups.
Can customers see a live preview of their personalization?
Only with a product customizer or visual configurator app, which renders the text on a product image. Options apps like Infinite Options collect the inputs and show font and placement previews but not a full mockup. For expensive items, sending a proof for approval is a reliable alternative.
Can personalization be edited after an order is placed?
Not through Shopify's normal order editing, which doesn't change line item properties. That's why it helps to add a spelling confirmation checkbox and show the text back in the cart before checkout.