How to let customers upload a logo or artwork on Shopify
Short answer
To let customers upload a logo or artwork on Shopify, add an upload field to the product page with an app like Uploadery, with rules for file type, file size and minimum pixel dimensions so unusable files are rejected before checkout. The file is attached to the order as a link your print or embroidery team can download.
What you ask for depends on how you produce the item: vector files for screen printing and embroidery, large high-resolution images for direct-to-garment, sublimation and photo prints.
This guide is for print-on-demand, embroidery, promo goods and signage shops. For the general mechanics, see how to let customers upload files on Shopify product pages.
What file to ask for, by production method
Ask whoever runs the press or embroidery machine which files they can use as-is and which they reject. That answer becomes your upload rules.
Screen printing, vinyl and embroidery: vector preferred
Screen printing, cut vinyl, laser engraving and embroidery all work from shapes and solid colors, so a vector file is the best input: AI, EPS, SVG or a PDF saved from a vector program. Vector art scales to any size without blurring. Many shops also accept a high-resolution PNG and redraw it, usually for a fee.
One caution: a .pdf, .ai or .eps file is not guaranteed to be vector, since a small JPEG can be saved inside one. Only a person opening the file can tell.
DTG, sublimation and photo prints: high-resolution PNG or JPEG
Direct-to-garment, dye sublimation, canvas, photo and large-format prints reproduce full-color images, so a raster file (PNG or JPEG) is normal. What matters is resolution at the printed size. A common guideline is 300 DPI at print size, and many shops accept 150 DPI for large items viewed from a distance, like banners.
The math is simple: pixels needed = inches x DPI. For a 10 by 12 inch print area at 300 DPI, the image should be at least 3,000 by 3,600 pixels. A 3.5 inch left-chest logo at 300 DPI needs about 1,050 pixels across. A 600 pixel logo from a website prints only 2 inches wide at 300 DPI.
Ignore the DPI number stored inside the file. It is just a label and can be changed without adding any detail. The pixel dimensions are what decide print quality. For transparent backgrounds on apparel, ask for PNG, since JPEG does not support transparency.
Embroidery needs digitizing
An embroidery machine cannot read a logo file directly. Someone has to digitize it: convert the artwork into a stitch file that tells the machine where each stitch goes. That is skilled work, so many shops charge a one-time digitizing or setup fee per design. Say so up front, and let customers with an existing stitch file upload it.
Set file rules that catch bad files at upload
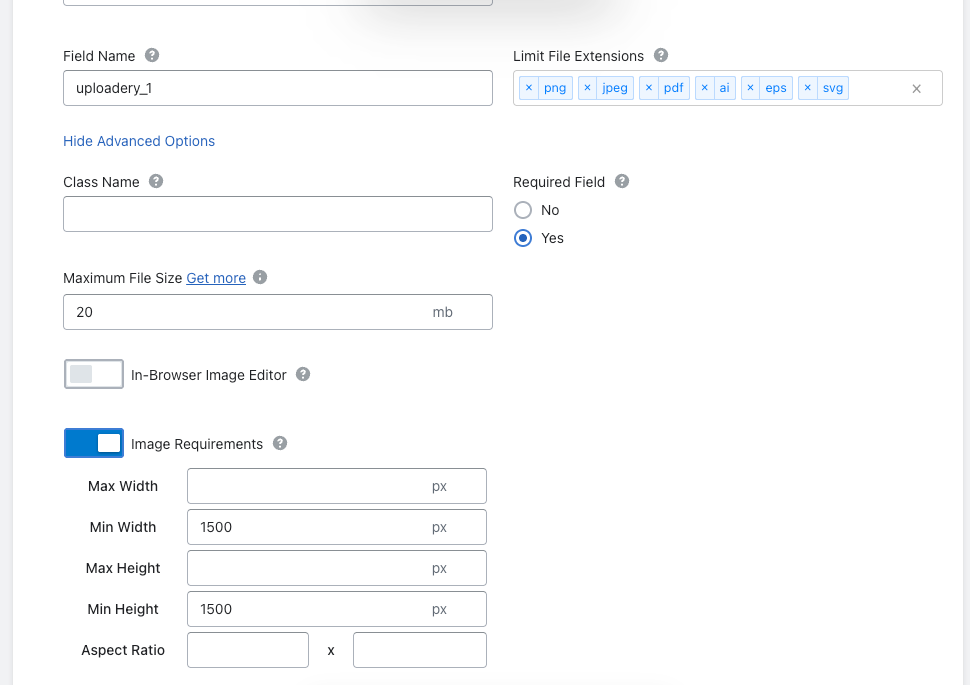
Every bad file caught on the product page is one less order on hold while you chase a better version. Set these rules on each upload field:
- Allowed file types. For an embroidery product, maybe AI, EPS, SVG, PDF and PNG. For a canvas print, PNG and JPEG only. Leave out formats you can't open.
- Maximum file size. High enough for real print files (layered or large-format files get big), low enough to stop someone uploading a video by mistake.
- Minimum width and height in pixels for raster images. Use the math above: for a 10 inch wide print at 300 DPI, a minimum width of 3,000 pixels. If you accept 150 DPI, use half that.
- Required. If the product can't be made without artwork, make the field required.
Be precise about what upload rules can and can't do. Uploadery checks file type, file size and, for images, pixel width and height. It does not read DPI or check color mode (RGB vs CMYK), and it can't tell whether a PDF contains vector art. A pixel minimum is the practical way to enforce resolution, because DPI at print size follows directly from the pixel count.
Tell customers what you need, next to the field
Most customers don't know what vector means. Put short help text right by the upload button:
- "Best: AI, EPS, SVG or PDF from your designer. PNG also works if it's at least 3,000 pixels wide."
- "Use the largest version of your logo you have. Images from a website or social media are usually too small."
Offer placement and size as options
Production also needs to know where the artwork goes and how big. Ask with options rather than free text:
- Placement as image swatches: left chest, full front, full back, sleeve, hat front.
- Print size as a short list of sizes you actually produce, like 3.5 inch, 8 inch, 11 inch.
Larger placements need larger files, so match your pixel minimum to the largest size you offer.
Charging a setup or digitizing fee
Setup fees for screens, digitizing or artwork cleanup belong on a selectable choice, such as "New design (+ digitizing fee)" vs "Repeat order, design on file". Whether the fee is bundled into the product price or added as its own line, and how that plays with quantity, is covered in charging for product add-ons.
Multi-packs and team orders with more than one logo
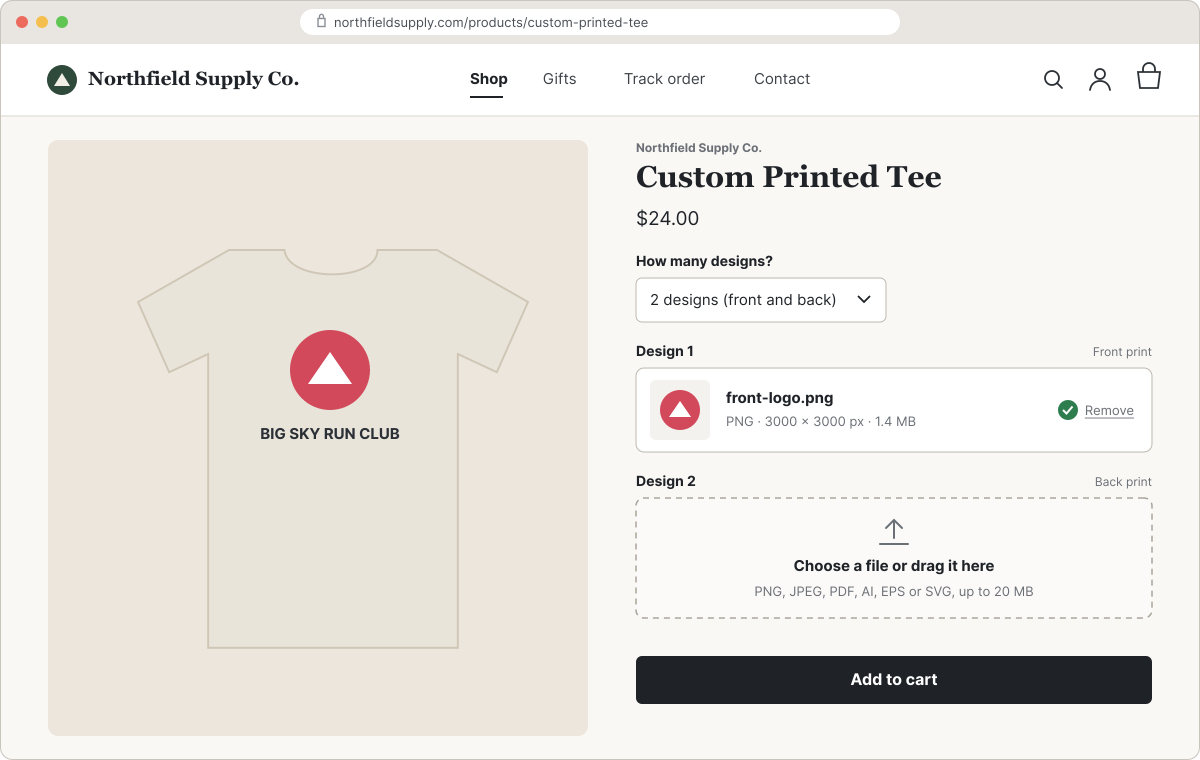
A 3-pack of shirts with a different design on each, or a sign with a front and back, needs one upload per design. The clean way to handle it is a question followed by separate upload fields:
- Ask "How many designs?" with choices 1, 2 and 3.
- Create one upload field per design, labeled "Design 1", "Design 2" and "Design 3".
- Use conditional logic so choosing 2 shows the first two fields, and choosing 3 shows all three.
Each file then lands on the order with its own clear label. Infinite Options can show or hide Uploadery fields based on an option choice (our help doc explains the setup). The same approach works for "Add your logo? Yes / No" on products where artwork is optional.
For larger team orders, separate cart lines per item are often easier for production than one line with many files.
Proof approval before production
File rules catch the obvious problems. They don't catch a logo with a white box around it or a misspelled slogan. For anything expensive or made in quantity, send a proof and start production only after the customer approves it. We cover how a proof step fits into a personalized order in our product personalization guide.
Ask customers to confirm they can use the artwork
Customers sometimes upload logos they don't own. Add a required checkbox next to the upload, such as "I own this artwork or have permission to use it." It doesn't replace your judgment or legal advice, but it records the customer's confirmation on the order and gives you a basis for declining files.
Getting files to production
Uploadery saves each upload as a line item property holding a link to the file, so it shows on the order in your Shopify admin next to the product it belongs to. From there:
- Order admin: click the link to download the file.
- Packing slips: add the upload links to your packing slip template so the person on the floor has the file and the placement on one sheet.
- Order notifications: include the links in your order confirmation or staff notification email, so your production inbox gets the file the moment the order is placed. Our help doc covers the template changes.
Showing the uploaded image in the cart also gives customers one more chance to spot the wrong file.
Setting it up with Uploadery
We make Uploadery, a file upload app for Shopify product pages. A typical setup for a print or embroidery shop:
- Install Uploadery, then turn on the Uploadery app embed in the theme editor and click Save. Upload fields appear above Add to cart. If you want them somewhere specific, add the Uploadery Fields app block to your product template. If fields don't appear, see why app fields don't show on your theme.
- Create an upload field and assign it to the right products by rules, with exclusions for products that shouldn't have it.
- Set the allowed file types, max file size and, for raster images, minimum width and height in pixels.
- Write help text that says which files work best and the minimum size.
- If you need placement, size, a setup fee, a "How many designs?" question or a rights checkbox, add those with Infinite Options and use its conditional logic to show the right upload fields.
- Add the upload links to your packing slip and order notification, then place a test order with a good file and a too-small file to check both paths.
Uploadery starts at $9.99/month with a 14-day free trial, with files up to 50MB on that plan and larger file plans available (as of October 2026). If customers design on the page with a live mockup, a product customizer may suit you better; see product configurator or product options app. If customers arrive with finished artwork, an upload field is usually all you need.
FAQs
What file format should customers upload for logo printing?
For screen printing, vinyl and embroidery, a vector file (AI, EPS, SVG or a vector PDF) is best because it scales without losing quality. For direct-to-garment, sublimation and photo prints, a high-resolution PNG or JPEG works, with PNG preferred when the background needs to be transparent.
How many pixels does an image need to print at 300 DPI?
Multiply the print size in inches by 300. A 10 inch wide print needs 3,000 pixels across, and a 3.5 inch logo needs about 1,050 pixels. The DPI value saved in the file doesn't matter; the pixel dimensions do.
Can Uploadery check the DPI or color mode of an uploaded file?
No. Uploadery checks file type, file size and the pixel width and height of images. To enforce resolution, set a minimum pixel width and height based on your largest print size. Color mode and whether a file is truly vector need a person to check, ideally as part of a proof.
Why do embroidery shops charge a digitizing fee?
Embroidery machines need a stitch file, not a logo image. Converting artwork into stitches is skilled work done once per design, so shops often charge a one-time digitizing fee.
Where do customer-uploaded files show up in Shopify?
With Uploadery, each file is saved as a line item property holding a link to the file, so it appears on the order in your Shopify admin. You can also add the links to packing slips and order notification emails.