How to change your Shopify theme without breaking your apps

Short answer
To change your Shopify theme without breaking your apps, add the new theme unpublished, turn on each app's app embed in it and re-add any app blocks. Re-apply code edits from your old theme, preview the new one and place a test order, then publish.
Shopify says it plainly: if you change your published theme, you'll need to re-activate your apps in the new theme "as they won't be active by default."
This is the most common question we get across our apps (we make Infinite Options, Uploadery and Tracktor). A merchant switches to a new theme and the product options or upload fields are gone. Nothing is broken and nothing was deleted. The new theme simply hasn't been told to load the app yet. This guide covers what carries over, what doesn't, and the checklist we walk merchants through.
Switching themes vs updating your theme
These are different jobs. Switching to a different theme starts from that theme's own files and settings, so app embeds, app blocks and code edits all have to be set up again. That is what this guide is mostly about.
Updating to a new version of the theme you already use is much safer. Shopify adds the new version to your theme library as an "Updated copy of" your theme and, per its update guide, copies over your theme editor customizations, including "adding, removing, or changing the settings of app embeds or app extensions." Code edits come along too, unless they conflict with the update. So after an update, check that your app fields still show and that any custom code survived, but you usually don't need to redo anything. Installing a new version by uploading a fresh copy from the theme developer is different: treat that like a switch.
You can do all of the work below while the new theme is unpublished. Shopify lets you customize and preview a theme before you publish it, so your live store keeps working the whole time.
What carries over and what doesn't
A lot of your store lives outside the theme, so it's untouched by a theme change. The problems come from the things that live inside the theme.
| Carries over (store-level) | Doesn't carry over (theme-level) |
|---|---|
| Products, variants, collections and prices | Theme settings (colors, fonts, layout choices) |
| Pages and blog posts | Sections and blocks you arranged in the theme editor |
| Navigation menus in Content > Menus | Which menu the header and footer use |
App proxy pages, like Tracktor's tracking page at /apps/tracktor/track | App embeds (each one starts switched off) |
| Notification templates in Settings > Notifications, including packing slip edits | App blocks you placed in templates |
| Your apps' own settings and data | Custom Liquid edits in theme files, such as code to show option selections or upload image previews in the cart |
Your apps keep every setting you made (option sets, upload fields, tracking settings), so you never rebuild those. You only switch the app back on in the new theme.
App embeds and app blocks, briefly
Apps connect to your theme in two ways, described in Shopify's help center:
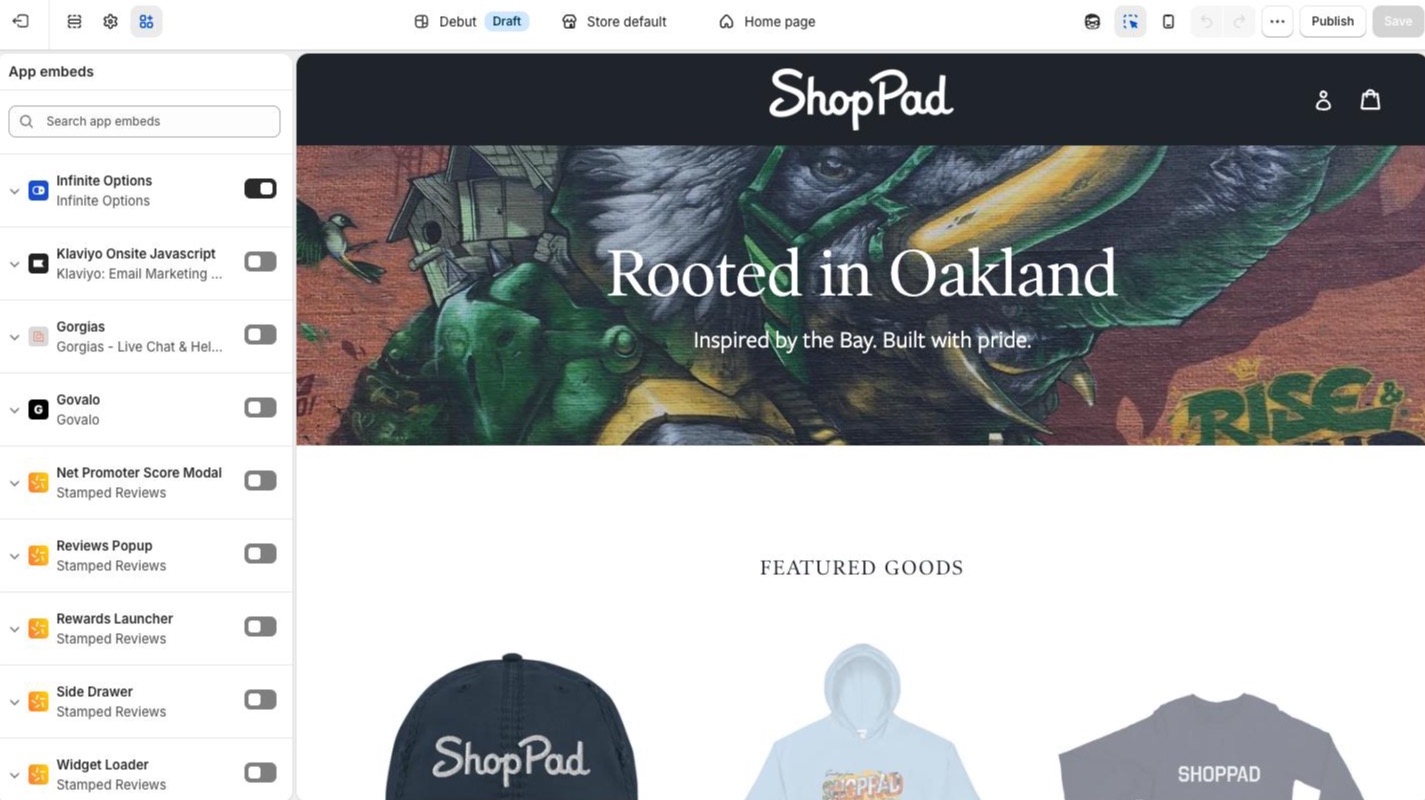
- App embeds add code to your store, or float an element over your pages, and work with any theme. You turn them on in the theme editor: open Online Store > Themes, click Customize (or Edit theme) on the new theme, click the App embeds icon in the sidebar, toggle the app on, and click Save.
- App blocks put an app's feature exactly where you want it in a template. They need an Online Store 2.0 theme, and you add, move or remove them in the theme editor like any other block.
Both are saved per theme. That's why a new theme starts with every embed off and no app blocks placed. If fields still don't show after you've switched the embed on, our guide to why app options or upload fields don't show on your Shopify theme goes through the other causes.
The checklist before you publish
- Add the new theme unpublished. In Online Store > Themes, add it to your theme library. Don't publish yet.
- List every installed app that touches your storefront. Check Settings > Apps and sales channels. Product options, upload fields, reviews, upsells, chat widgets and tracking pages all count. Admin-only apps don't need anything.
- For each app, turn on its app embed in the new theme's App embeds panel, and click Save.
- Re-add app blocks wherever the old theme had them, usually in the product template. Open the old theme's editor in another tab to see where each block sat.
- Re-apply code edits. Liquid edits in the old theme are not in the new one. List them first (cart and product templates are the usual places), then copy each into the matching file in the new theme. File names often differ between themes.
- Set your header and footer menus in the new theme so links like Track your order still appear.
- Preview and test on desktop and mobile, then place a test order (walkthrough below).
- Publish.
Infinite Options on a new theme
For Infinite Options, the app embed is the on/off switch. Turn on the Infinite Options embed in the new theme, save, and your option sets appear above the Add to cart button on every product they're assigned to. Your option sets, conditional logic and price add-ons are all still in the app, untouched.
Two optional pieces to check:
- The Infinite Options app block. If you used it in your old theme to place options in a specific spot, add it again to the new theme's product template. A few older installs used a script tag instead of the embed; if yours was one of them, use the app block on the new theme.
- The Dynamic Bundling Price Block. If you charge for add-ons and used this block so the product page price updates when a customer picks a paid option, add it again in the new theme (it needs an Online Store 2.0 theme).
If you added code to show option selections on the cart page, re-apply it from our cart display guide. Many themes show selections in the cart without changes (see Shopify line item properties, explained), so check first.
Uploadery on a new theme
Uploadery works the same way. Our install guide says the setup only needs to be done once for each theme you use, which is exactly why a new theme needs it again:
- Turn on the Uploadery app embed and save. Upload fields then show above the Add to cart button on the products they're assigned to.
- Re-add the Uploadery Fields block if you used it for exact placement. Add only one per product template; it shows every upload field assigned to that product.
- Re-add the cart image preview code if you used it. The cart image preview is a snippet pasted into your theme's cart file (
cart.liquid,main-cart-items.liquidor similar, depending on the theme), so it stays behind in the old theme. The same goes for the product page image preview if you added it.
Upload links in your order confirmation emails and packing slips live in Settings > Notifications, not in the theme, so they keep working. For more on how upload fields work in general, see how to let customers upload files on Shopify product pages.
Tracktor on a new theme
With Tracktor, there's nothing to redo on the tracking page. It's served at /apps/tracktor/track through a Shopify app proxy, so it doesn't depend on your theme. Tracking links in your emails live in Settings > Notifications, so those are fine too.
The one thing to check is the link. Menus in Content > Menus carry over, but the new theme's header and footer each choose which menu to show. Make sure they use the menu that holds your Track your order link. Our guide to adding an order tracking page has the menu steps if you need to add the link again.
Test order walkthrough
Preview the unpublished theme and shop it the way a customer would:
- Open a product that uses options or upload fields. Check the fields appear, in the right place, on desktop and on a phone.
- Fill them in, pick a paid option if you have one, and upload a test image.
- Add to cart. Check the cart shows the selections, the upload link or image preview, and any add-on line.
- Check out (a 100% discount code works), then cancel the test order afterwards.
- Open the order in your admin. The option values and upload links should be on the line item. Check the order confirmation email too.
- Click the Track your order link in the header or footer and look up the order.
Also try any quick view or quick add buttons on collection pages. They can add a product to the cart without loading the product form, so fields won't show there.
After you publish
- Keep the old theme in your library, unpublished, for a few weeks, so you can compare how things were set up and switch back if you need to.
- Leave behind code from apps you've uninstalled. Apps that added code directly to theme files can leave it there after removal. Don't copy those snippets into the new theme.
- Watch your first real orders to confirm option values and upload links come through.
If you'd rather we set it up
Our Expert Install Service sets up and styles the app on a theme for you, including cart display and order email setup. It covers one theme, so if you switch themes you request it again for the new one. See what's included for Infinite Options and Uploadery. And if you're still choosing an options app for the new theme, our product options apps comparison covers theme compatibility.
FAQs
Will I lose my apps if I change my Shopify theme?
No. Your apps stay installed, and their settings and data are kept. But apps that connect to your theme won't be active in the new theme by default. Turn on each app's app embed and re-add any app blocks in the new theme before you publish it.
Does updating my Shopify theme to a new version break my apps?
Usually not. Shopify's built-in theme update copies your theme editor customizations, including app embeds and app blocks, into the new version, along with code edits that don't conflict with the update. Check your app fields and any custom code after updating. Uploading a fresh copy of a theme instead of using the update is like switching themes: set the apps up again.
Why did my product options or upload fields disappear after I changed themes?
Almost always because the app's app embed is off in the new theme. Open Online Store > Themes, click Customize on the theme, open App embeds, switch the app on, and click Save.
Do my menus and pages carry over to a new Shopify theme?
Yes. Menus, pages, products and app proxy pages like an order tracking page are store-level and carry over. You still need to check that the new theme's header and footer are set to use the right menus.