How to add an order tracking page to your Shopify store

Short answer
Shopify doesn't include a "Track your order" page in your online store, so you add one yourself. Create a simple page that tells customers where to find tracking, or install a tracking app that adds order lookup by order number and email, no account needed. Then link it from your main menu, footer and shipping emails.
A simple page can also link to customer account sign-in, where customers with an account see their orders and tracking.
This guide starts with what Shopify already gives you, then walks through both options, step by step. We make Tracktor, a tracking app, so we use it for the app example, but we'll say where the no-app page is enough.
What Shopify gives you already
Before you build anything, it helps to know where your customers can already check on an order:
- The order status page. Every order gets one. It's the last page of checkout, and customers reach it again from the links in your order and shipping emails. For supported carriers it shows live statuses and a map; for others, a link to the carrier's site. Customers can open it without logging in for three weeks in the same browser, or two weeks across up to five browsers, according to Shopify. We cover what you can change on it in our guide to the Shopify order status page.
- Customer accounts. Signed-in customers can see their upcoming and delivered orders. Sign-in is passwordless: customers enter their email and get a one-time 6-digit code (Shopify Help Center).
- The Shop app. Customers who use Shop can follow their orders there, and the order status page can offer a "Track with Shop" option.
- Shipping emails. Shopify sends Shipping confirmation, Shipping update, Out for delivery and Delivered notifications (Shopify Help Center).
Why stores still add a "Track your order" page
All of those options start with an email or an account. That's where "where is my order?" (WISMO) messages come from:
- Customers can't find the email. It went to spam, to a promotions tab, or to an address they rarely check. Your menu is the first place they look, and there's nothing there.
- Links time out. After the login-free window ends, the order status page asks customers to log in or enter their order number with their email or phone number. A slow shipment can easily outlast it.
- Guests have no account. Many customers check out as guests, and "sign in to see your orders" doesn't sound like an answer to them.
- Not everyone uses Shop. It's a good option for customers who have it, but you can't count on it.
A page in your menu called "Track your order" gives customers one obvious place to go, even when the email is gone.
Option 1: a "How to track your order" page, no app
If you ship a modest number of orders with carriers Shopify supports, a plain Shopify page can be enough. It doesn't track anything itself. It tells customers where to look.
- In your Shopify admin, go to Online Store > Pages and click Add page (Shopify's guide).
- Title it "Track your order".
- Explain the options in a few short lines: check your shipping confirmation email for the tracking link, search your inbox for your order number, or sign in to your account to see your orders.
- Add a link to your customer account sign-in page and your support email or contact page.
- Save the page, then add it to your menus (see the menu steps below).
The limits are worth knowing before you settle on it:
- Customers still need the email or an account. The page points them somewhere else instead of showing the order.
- For carriers Shopify doesn't support, customers end up on the carrier's website, not yours.
- Nothing on the page updates. If an order is delayed, the customer still has to ask you.
For a small store with few tracking questions, that's a fair trade for zero cost. If you're answering several WISMO emails a week, move to option 2.
Option 2: a tracking page with order lookup
A tracking app adds a real tracking page to your store. Customers type in their order number and email address and see where the package is, right on your site. No account, no email hunting, and no expiring link.
Most order tracking apps offer some version of this page. If you're still choosing one, our comparison of Shopify order tracking apps sorts them by job and store size, and AfterShip alternatives compared lists plans and prices side by side. If your customers are being sent to 17track.net to follow their parcels, see 17track alternatives for Shopify merchants.
The steps below use Tracktor. Other apps follow a similar pattern, with their own page URL.
How to set up a tracking page with Tracktor
Step 1: Install Tracktor
Install Tracktor from the Shopify App Store. The free Starter plan includes the real-time tracking page for up to 25 orders a month. Paid plans start at $4.99 a month (as of October 2026) and come with a 14-day free trial. Tracktor supports more than 1,900 carriers.
Step 2: Find your tracking page
Once installed, your tracking page is live at /apps/tracktor/track on your store's domain, for example yourstore.com/apps/tracktor/track. It's a Shopify app proxy page, so it sits on your own domain and uses your theme. Open it in a browser and try a lookup with a recent order number and the email used on that order.
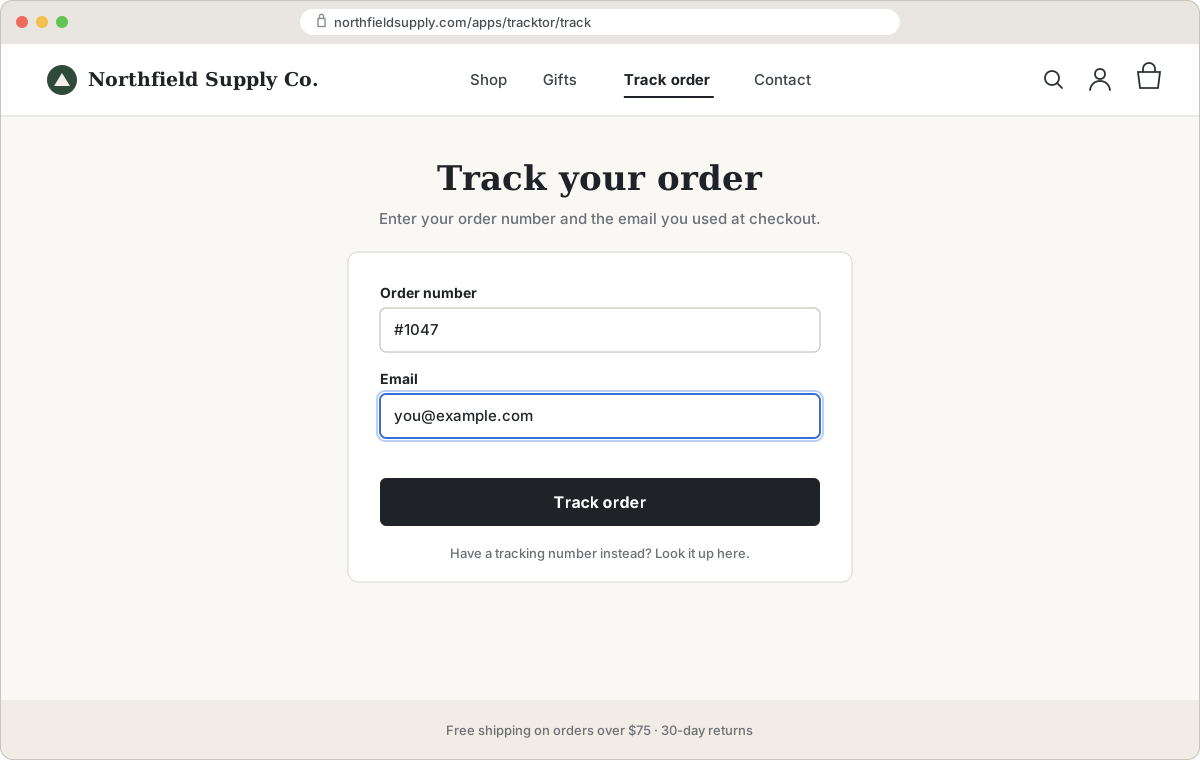
Step 3: Add it to your main menu and footer
- In your Shopify admin, go to Content > Menus (Shopify's guide).
- Select your main menu and click Add menu item.
- Name it "Track your order" and paste
/apps/tracktor/trackas the link. - Click Add, then Save menu.
- Repeat for your footer menu.
Tracktor's help center has the same steps with screenshots: add Tracktor to your store's navigation. The main menu matters most on mobile, where customers rarely scroll to the footer.
Step 4: Link it from your shipping emails
Customers who do find the email should land on the same page. Tracktor's guide to helping customers track orders shows how to add tracking links to your Order confirmation, Shipping confirmation, Shipping update, Out for delivery and Delivered templates in Settings > Notifications > Customer notifications. Those links can open the customer's order directly, so there's nothing to type.
Step 5: Turn on Out for delivery and Delivered notifications
Two well-timed emails head off a lot of questions: one when the package is out for delivery, and one when it arrives. Shopify can send both on its own, but only for carriers it tracks. In Tracktor, one toggle turns on fulfillment events: when Tracktor sees a package go out for delivery or arrive, it updates the fulfillment in Shopify, and Shopify sends its own Shipment out for delivery or Shipment delivered email. Customers get your usual Shopify emails, once per shipment, for every carrier Tracktor supports. Notifications are on the paid plans, starting with Flex at $4.99 a month for 200 orders.
Step 6 (optional): Link it from your contact page and FAQ
Most WISMO messages start on your contact page. Add a line above the form, such as "Looking for your order? Track it here," linked to /apps/tracktor/track. Do the same in any shipping FAQ, so customers get an answer before they write to you.
If you'd rather not do any of this yourself, our free Expert Install Service will set it up for you.
What a good tracking page includes
Whichever app you use, check your page against this list:
- Lookup without an account. Order number plus email. Guests are often the ones asking.
- Current status and a timeline. Not just "In transit", but each scan with a date, so customers can see it's moving.
- A delivery estimate. The question behind most WISMO emails is "when?", not "where?". (In Tracktor, delivery date estimates are on the Growth plan and up.)
- A map. A route map makes a long journey feel less like a black hole.
- A link to the carrier. Some customers want to check the source or arrange redelivery.
- A way to contact you. If something is wrong, the customer should be one click from support.
- Your theme and domain. The page should look like your store, not a third-party site, so customers trust it and keep browsing.
- Mobile first. Most customers will check from their phone, often straight from an email. Test the lookup on a phone.
Measure it
The point of a tracking page is fewer "where is my order?" messages, so measure that directly:
- Before you launch the page, count WISMO tickets for a few weeks. If your help desk supports tags, tag them; if not, search for phrases like "where is my order", "tracking" and "hasn't arrived".
- Launch the page, the menu links and the email links together.
- Count the same way for the same length of time afterward, and compare per 100 orders so a busy month doesn't skew it.
Look at the tickets that still come in. If they're about one carrier, check whether that carrier's shipments show useful updates. If customers say they couldn't find tracking, make the menu link more visible or add it to your order confirmation email.
FAQs
Does Shopify have a built-in "track your order" page?
No. Shopify gives each order an order status page reached from your emails, and signed-in customers can see their orders in their account, but there's no standalone tracking page in your online store menu. You add one with a regular page or a tracking app.
Can customers look up an order without an account?
Yes, with a tracking app that offers order lookup. On a Tracktor tracking page, customers enter their order number and email address and see the order's status without signing in.
Where is the Tracktor tracking page in my store?
At /apps/tracktor/track on your store's domain. Add it to your main menu and footer in Content > Menus by creating a menu item with that link.
Is a no-app tracking page enough?
It can be for a small store that ships with carriers Shopify supports and gets few tracking questions. It only tells customers where to look, so if you're answering several "where is my order?" emails a week, a page with order lookup usually saves more time.